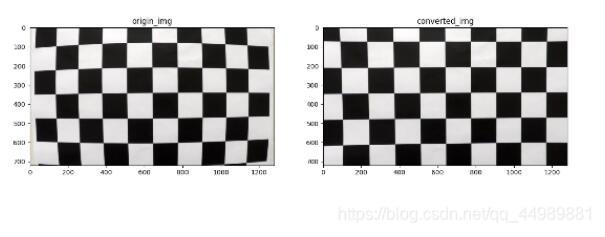
本文实例为大家分享了OpenCV实现相机校正的具体代码,供大家参考,具体内容如下
1. 相机标定
根据张正友校正算法,利用棋盘格数据校正对车载相机进行校正,计算其内参矩阵,外参矩阵和畸变系数。
标定的流程是:
- 准备棋盘格数据,即用于标定的图片
- 对每一张图片提取角点信息
- 在棋盘上绘制提取到的角点(非必须,只是为了显示结果)
- 利用提取的角点对相机进行标定
- 获取相机的参数信息
2.关于相机校正用到的几个API:
1、寻找棋盘图中的棋盘角点
rect, corners = cv2.findChessboardCorners(image, pattern_size, flags)参数:
- Image: 输入的棋盘图,必须是8位的灰度或者彩色图像
- Pattern_size:棋盘图中每行每列的角点个数(内角点)。
- flags: 用来定义额外的滤波步骤以有助于寻找棋盘角点。所有的变量都可以单独或者以逻辑或的方式组合使用。取值主要有:
CV_CALIB_CB_ADAPTIVE_THRESH :使用自适应阈值(通过平均图像亮度计算得到)将图像转换为黑白图,而不是一个固定的阈值。
CV_CALIB_CB_NORMALIZE_IMAGE :在利用固定阈值或者自适应的阈值进行二值化之前,先使用cvNormalizeHist来均衡化图像亮度。
CV_CALIB_CB_FILTER_QUADS :使用其他的准则(如轮廓面积,周长,方形形状)来去除在轮廓检测阶段检测到的错误方块。
返回:
- Corners:检测到的角点
- rect: 输出是否找到角点,找到角点返回1,否则返回0
2、检测完角点之后可以将测到的角点绘制在图像上,使用的API是:
cv2.drawChessboardCorners(img, pattern_size, corners, rect)参数:
- Img: 预绘制检测角点的图像
- pattern_size : 预绘制的角点的形状
- corners: 角点矩阵
- rect: 表示是否所有的棋盘角点被找到,可以设置为findChessboardCorners的返回值
注意:如果发现了所有的角点,那么角点将用不同颜色绘制(每行使用单独的颜色绘制),并且把角点以一定顺序用线连接起来。
3、利用定标的结果计算内外参数
ret, mtx, dist, rvecs, tvecs = cv2.calibrateCamera(object_points, image_points, image_size, None, None)参数:
- Object_points:世界坐标系中的点,在使用棋盘的场合,令z的坐标值为0,而x,y坐标用里面来度量,选用英寸单位,那么所有参数计算的结果也是用英寸表示。最简单的方式是定义棋盘的每一个方块为一个单位。
- image_points:在图像中寻找到的角点的坐标,包含object_points所提供的所有点
- image_size: 图像的大小,以像素为衡量单位
返回:
- ret: 返回值
- mtx: 相机的内参矩阵,大小为3*3的矩阵
- dist: 畸变系数,为5*1大小的矢量
- rvecs: 旋转变量
- tvecs: 平移变量
2.1 图像去畸变
上一步中得到相机的内参及畸变系数,利用其进行图像的去畸变,最直接的方法就是调用opencv中的函数得到去畸变的图像:
def img_undistort(img, mtx, dist):
    dst = cv2.undistort(img, mtx, dist, None, mtx)
    return dst
求畸变的API:
dst = cv2.undistort(img, mtx, dist, None, mtx)参数:
- Img: 要进行校正的图像
- mtx: 相机的内参
- dist: 相机的畸变系数
返回:
- dst: 图像校正后的结果
3. 相机校正
import cv2
import numpy as np
import matplotlib.pyplot as plt
import matplotlib.image as mpimg
import glob

def plot_contrast_imgs(origin_img, converted_img, origin_img_title="origin_img", converted_img_title="converted_img", converted_img_gray=False):
    """
    用于对比显示两幅图像
    """
    fig, (ax1, ax2) = plt.subplots(1, 2, figsize=(15, 20))
    ax1.set_title(origin_img_title)
    ax1.imshow(origin_img)
    ax2.set_title(converted_img_title)
    if converted_img_gray==True:
        ax2.imshow(converted_img, cmap="gray")
    else:
        ax2.imshow(converted_img)
    plt.show()

# 1. 参数设定:定义棋盘横向和纵向的角点个数并指定校正图像的位置
nx = 9
ny = 6
file_paths = glob.glob("./camera_cal/calibration*.jpg")
# 2. 计算相机的内外参数及畸变系数
def cal_calibrate_params(file_paths):
    object_points = []  # 三维空间中的点:3D
    image_points = []   # 图像空间中的点:2d
    # 2.1 生成真实的交点坐标:类似(0,0,0), (1,0,0), (2,0,0) ....,(6,5,0)的三维点
    objp = np.zeros((nx * ny, 3), np.float32)
    objp[:, :2] = np.mgrid[0:nx, 0:ny].T.reshape(-1, 2)
    # 2.2 检测每幅图像角点坐标
    for file_path in file_paths:
        img = cv2.imread(file_path)
        # 将图像转换为灰度图
        gray = cv2.cvtColor(img, cv2.COLOR_BGR2GRAY)
        # 自动检测棋盘格内4个棋盘格的角点(2白2黑的交点)
        rect, corners = cv2.findChessboardCorners(gray, (nx, ny), None)
        # 若检测到角点,则将其存储到object_points和image_points
        if rect == True:
            object_points.append(objp)
            image_points.append(corners)
    # 2.3 获取相机参数
    ret, mtx, dist, rvecs, tvecs = cv2.calibrateCamera(object_points, image_points, gray.shape[::-1], None, None)
    return ret, mtx, dist, rvecs, tvecs


def img_undistort(img, mtx, dist):
    """
    图像去畸变
    """
    return cv2.undistort(img, mtx, dist, None, mtx)

# 测试去畸变函数的效果
file_paths = glob.glob("./camera_cal/calibration*.jpg")
ret, mtx, dist, rvecs, tvecs = cal_calibrate_params(file_paths)
if mtx.any() != None:  # a.any() or a.all()
    img = mpimg.imread("./camera_cal/calibration1.jpg")
    undistort_img = img_undistort(img, mtx, dist)
    plot_contrast_imgs(img, undistort_img)
    print("done!")
else:
    print("failed")
执行代码:

以上就是本文的全部内容,希望对大家的学习有所帮助,也希望大家多多支持python博客。
-
<< 上一篇 下一篇 >>
标签:numpy matplotlib
OpenCV实现相机校正
看: 1813次 时间:2021-07-13 分类 : python教程
- 相关文章
- 2021-12-20Python 实现图片色彩转换案例
- 2021-12-20python初学定义函数
- 2021-12-20图文详解Python如何导入自己编写的py文件
- 2021-12-20python二分法查找实例代码
- 2021-12-20Pyinstaller打包工具的使用以及避坑
- 2021-12-20Facebook开源一站式服务python时序利器Kats详解
- 2021-12-20pyCaret效率倍增开源低代码的python机器学习工具
- 2021-12-20python机器学习使数据更鲜活的可视化工具Pandas_Alive
- 2021-12-20python读写文件with open的介绍
- 2021-12-20Python生成任意波形并存为txt的实现
-
搜索
-
-
推荐资源
-
Powered By python教程网 鲁ICP备18013710号
python博客 - 小白学python最友好的网站!