前言
在CSDN发的第一篇文章,时隔两年,终于实现了爬微博的自由!本文可以解决微博预登录、识别“展开全文”并爬取完整数据、翻页设置等问题。由于刚接触爬虫,有部分术语可能用的不正确,请大家多指正!
一、区分动态爬虫和静态爬虫
1、静态网页
静态网页是纯粹的HTML,没有后台数据库,不含程序,不可交互,体量较少,加载速度快。静态网页的爬取只需四个步骤:发送请求、获取相应内容、解析内容及保存数据。2、动态网页
动态网页上的数据会随时间及用户交互发生变化,因此数据不会直接呈现在网页源代码中,数据将以Json的形式保存起来。因此,动态网页比静态网页多了一步,即需渲染获得相关数据。3、区分动静态网页的方法
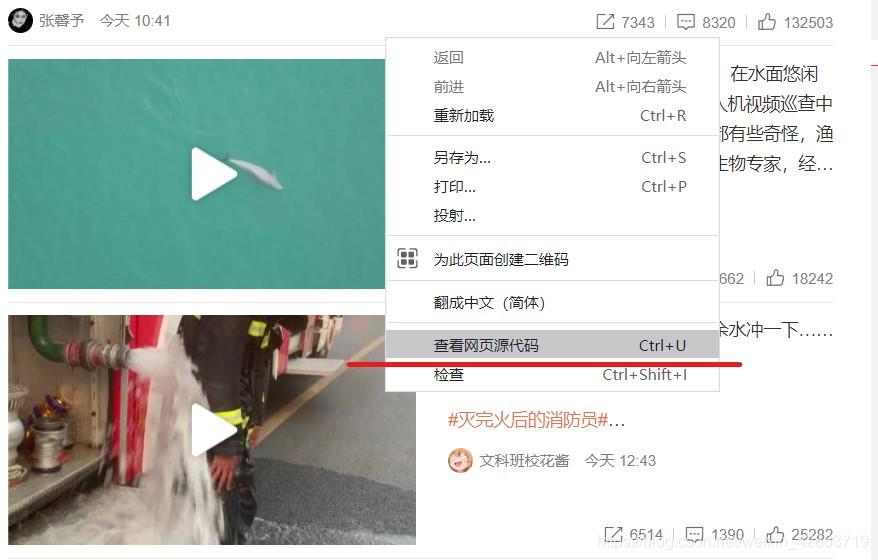
加载网页后,点击右键,选中“查看网页源代码”,如果网页上的绝大多数字段都出现源代码中,那么这就是静态网页,否则是动态网页。
二、动态爬虫的两种方法
1.逆向分析爬取动态网页
适用于调度资源所对应网址的数据为json格式,Javascript的触发调度。主要步骤是获取需要调度资源所对应的网址-访问网址获得该资源的数据。(此处不详细讲解)2.使用Selenium库爬取动态网页
使用Selenium库,该库使用JavaScript模拟真实用户对浏览器进行操作。本案例将使用该方法。三、安装Selenium库及下载浏览器补丁
1.Selenium库使用pip工具进行安装即可。
2.下载与Chrome浏览器版本匹配的浏览器补丁。
Step1:查看Chrome的版本
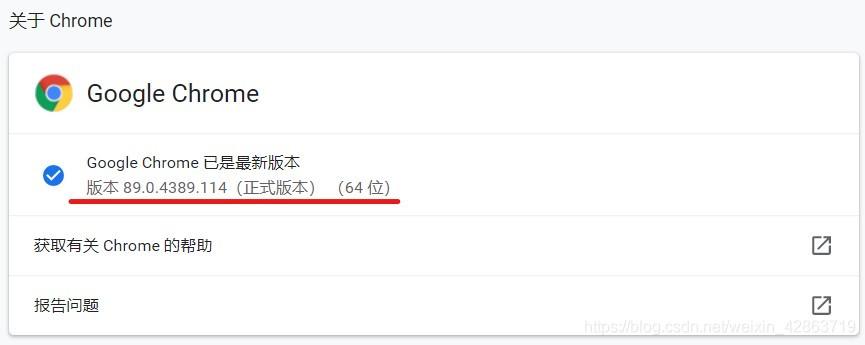
Step2:去下载相应版本的浏览器补丁。网址:http://npm.taobao.org/mirrors/chromedriver/
Step3:解压文件,并将之放到与python.exe同一文件下

四、页面打开及预登录
1.导入selenium包
from selenium import webdriver
from selenium.webdriver.support import expected_conditions as EC
from selenium.webdriver.support.ui import WebDriverWait
from selenium.webdriver.common.by import By
import time
import pandas as pd
2.打开页面
driver = webdriver.Chrome()
print('准备登陆Weibo.cn网站...')
#发送请求
driver.get("https://login.sina.com.cn/signup/signin.php")
wait = WebDriverWait(driver,5)
#重要:暂停1分钟进行预登陆,此处填写账号密码及验证
time.sleep(60)
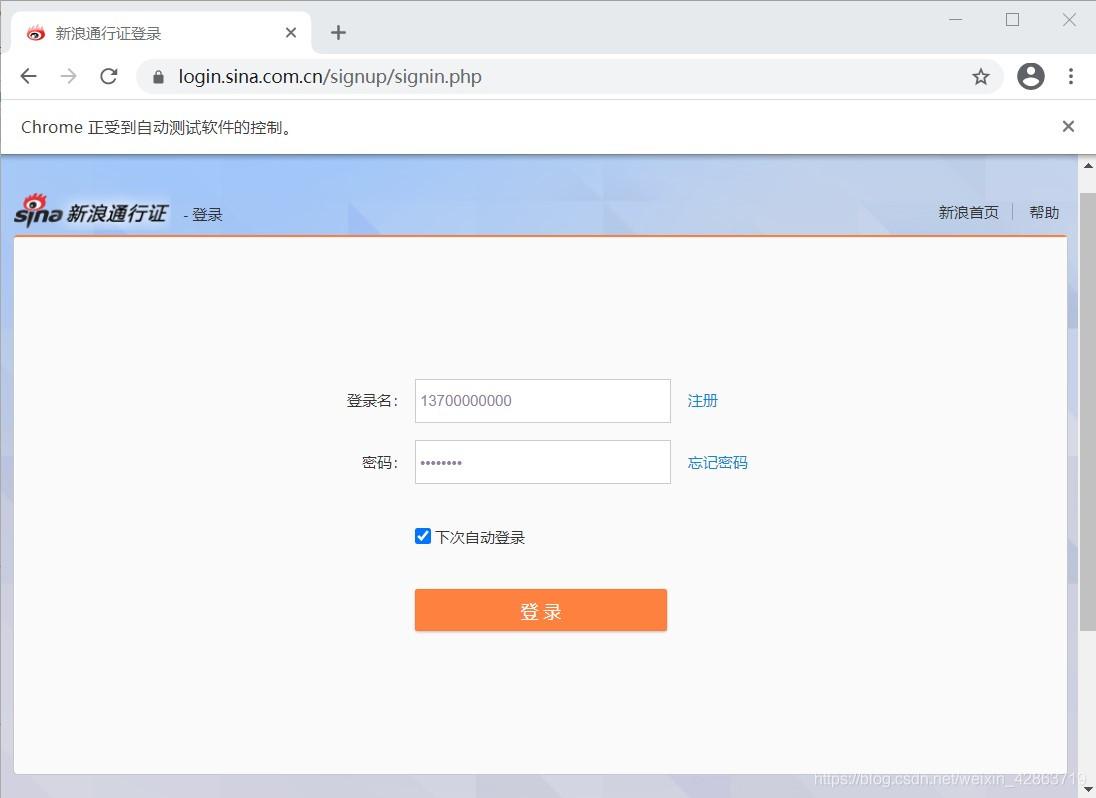
3.采用交互式运行,运行完上面两段程序,会弹出一个框,这个框就是用来模拟网页的交互。在这个框中完成登录(包括填写登录名、密码及短信验证等)
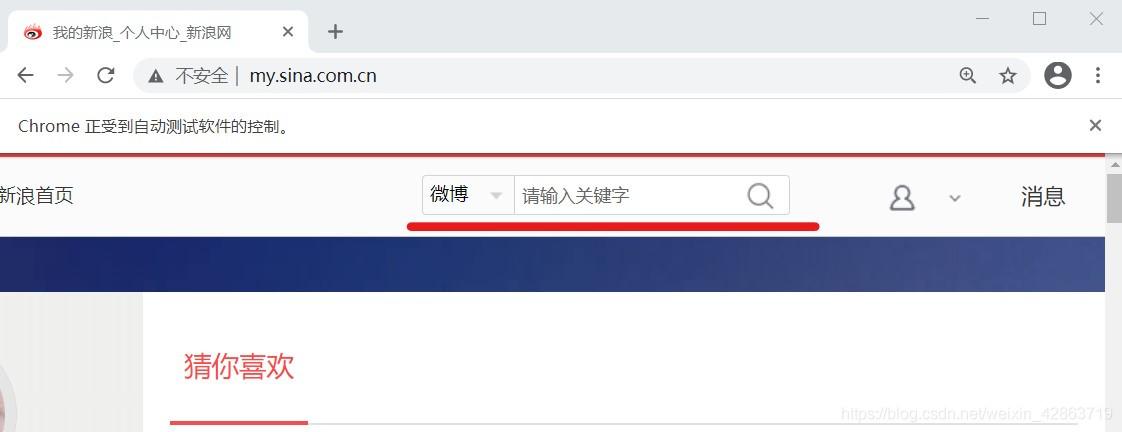
4.完成预登录,则进入个人主页
五、关键词搜索操作
1.定位上图中的关键词输入框,并在框中输入搜索对象,如“努力学习”
#使用selector去定位关键词搜索框
s_input = driver.find_element_by_css_selector('#search_input')
#向搜索框中传入字段
s_input.send_keys("努力学习")
#定位搜索键
confirm_btn = driver.find_element_by_css_selector('#search_submit')
#点击
confirm_btn.click()
2.当完成上步的代码运行后,会弹出新的窗口,从个人主页跳到微博搜索页。但是driver仍在个人主页,需要人为进行driver的移动,将之移动到微博搜索页。
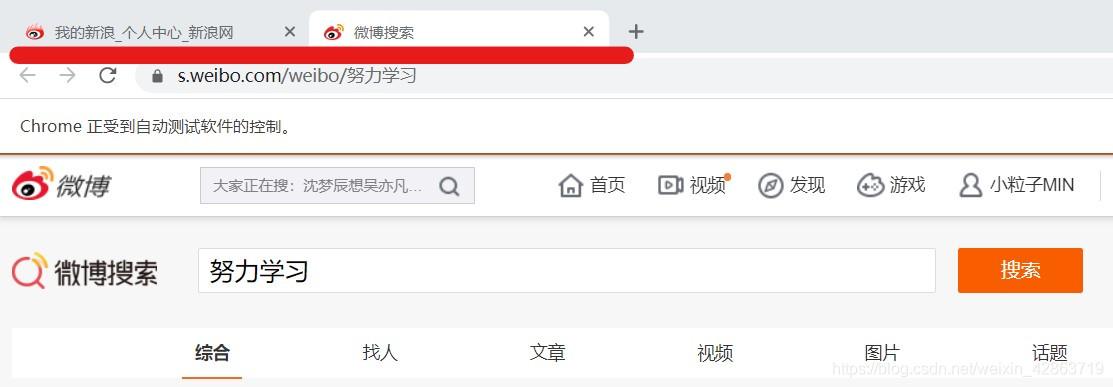
3.使用switch_to.window()方法移位
#人为移动driver
driver.switch_to.window(driver.window_handles[1])
六、识别“展开全文”并爬取数据
1.了解每个元素的Selector,用以定位(重点在于唯一标识性)
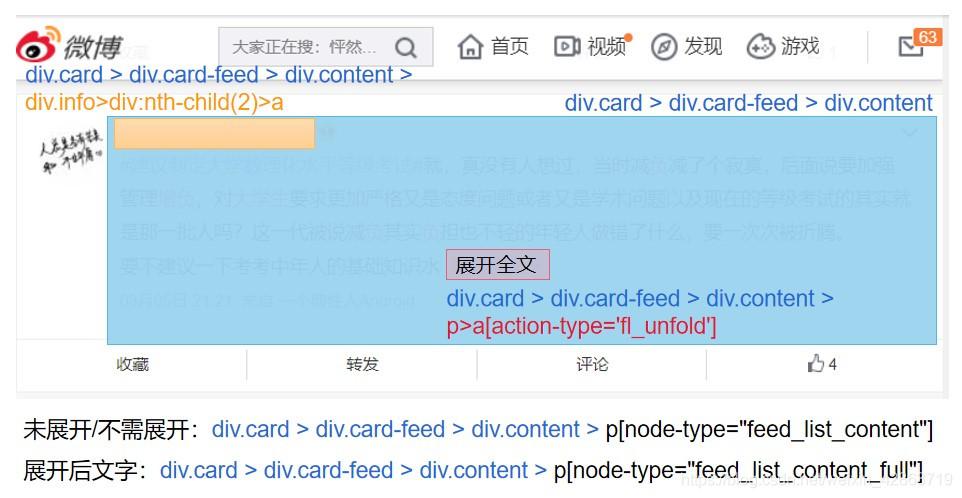
2.使用Selector定位元素,并获取相应的数据
comment = []
username = []

#抓取节点:每个评论为一个节点(包括用户信息、评论、日期等信息),如果一页有20条评论,那么nodes的长度就为20
nodes = driver.find_elements_by_css_selector('div.card > div.card-feed > div.content')

#对每个节点进行循环操作
for i in range(0,len(nodes),1):
    #判断每个节点是否有“展开全文”的链接
    flag = False
    try:
        nodes[i].find_element_by_css_selector("p>a[action-type='fl_unfold']").is_displayed()
        flag = True
    except:
        flag = False

    #如果该节点具有“展开全文”的链接,且该链接中的文字是“展开全文c”,那么点击这个要素,并获取指定位置的文本;否则直接获取文本
    #(两个条件需要同时满足,因为该selector不仅标识了展开全文,还标识了其他元素,没有做到唯一定位)
    if(flag and nodes[i].find_element_by_css_selector("p>a[action-type='fl_unfold']").text.startswith('展开全文c')):
        nodes[i].find_element_by_css_selector("p>a[action-type='fl_unfold']").click()
        comment.append(nodes[i].find_element_by_css_selector('p[node-type="feed_list_content_full"]').text)
    else:
        comment.append(nodes[i].find_element_by_css_selector('p[node-type="feed_list_content"]').text)
    username.append(nodes[i].find_element_by_css_selector("div.info>div:nth-child(2)>a").text)
七、设置翻页
1.使用for循环实现翻页,重点在于识别“下一页”按钮,并点击它
for page in range(49):
    print(page)
    # 定位下一页按钮
    nextpage_button = driver.find_element_by_link_text('下一页')
    #点击按键
    driver.execute_script("arguments[0].click();", nextpage_button)
    wait = WebDriverWait(driver,5)
    #与前面类似
    nodes1 = driver.find_elements_by_css_selector('div.card > div.card-feed > div.content')
    for i in range(0,len(nodes1),1):
        flag = False
        try:
            nodes1[i].find_element_by_css_selector("p>a[action-type='fl_unfold']").is_displayed()
            flag = True

        except:
            flag = False
        if (flag and nodes1[i].find_element_by_css_selector("p>a[action-type='fl_unfold']").text.startswith('展开全文c')):
            nodes1[i].find_element_by_css_selector("p>a[action-type='fl_unfold']").click()
            comment.append(nodes1[i].find_element_by_css_selector('p[node-type="feed_list_content_full"]').text)
        else:
            comment.append(nodes1[i].find_element_by_css_selector('p[node-type="feed_list_content"]').text)
        username.append(nodes1[i].find_element_by_css_selector("div.info>div:nth-child(2)>a").text)
八、保存数据
1.使用DataFrame保存字段
data = pd.DataFrame({'username':username,'comment':comment})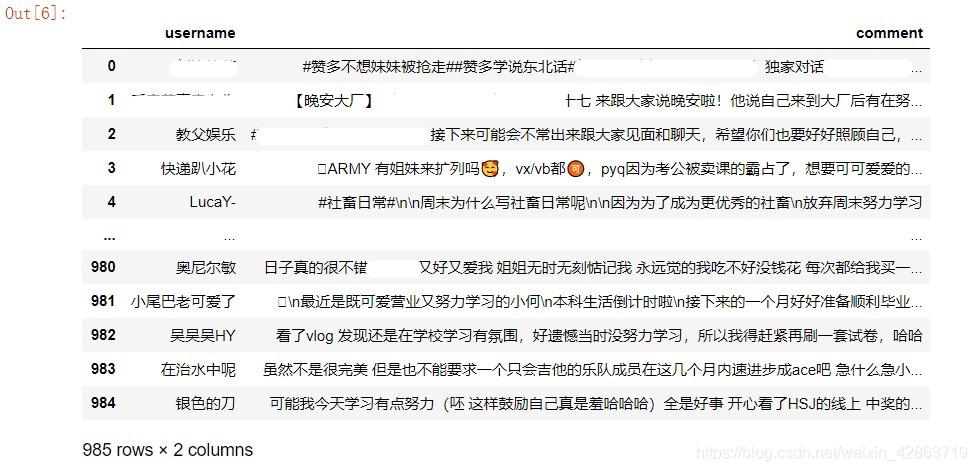
2.导出到Excel
data.to_excel("weibo.xlsx")九、完整代码
from selenium import webdriver
from selenium.webdriver.support import expected_conditions as EC
from selenium.webdriver.support.ui import WebDriverWait
from selenium.webdriver.common.by import By
from bs4 import BeautifulSoup
import time
import pandas as pd

'''打开网址,预登陆'''
driver = webdriver.Chrome()
print('准备登陆Weibo.cn网站...')
#发送请求
driver.get("https://login.sina.com.cn/signup/signin.php")
wait = WebDriverWait(driver,5)
#重要:暂停1分钟进行预登陆,此处填写账号密码及验证
time.sleep(60)

'''输入关键词到搜索框,完成搜索'''
#使用selector去定位关键词搜索框
s_input = driver.find_element_by_css_selector('#search_input')
#向搜索框中传入字段
s_input.send_keys("努力学习")
#定位搜索键
confirm_btn = driver.find_element_by_css_selector('#search_submit')
#点击
confirm_btn.click()

#人为移动driver
driver.switch_to.window(driver.window_handles[1])

'''爬取第一页数据'''
comment = []
username = []

#抓取节点:每个评论为一个节点(包括用户信息、评论、日期等信息),如果一页有20条评论,那么nodes的长度就为20
nodes = driver.find_elements_by_css_selector('div.card > div.card-feed > div.content')

#对每个节点进行循环操作
for i in range(0,len(nodes),1):
    #判断每个节点是否有“展开全文”的链接
    flag = False
    try:
        nodes[i].find_element_by_css_selector("p>a[action-type='fl_unfold']").is_displayed()
        flag = True
    except:
        flag = False

    #如果该节点具有“展开全文”的链接,且该链接中的文字是“展开全文c”,那么点击这个要素,并获取指定位置的文本;否则直接获取文本
    #(两个条件需要同时满足,因为该selector不仅标识了展开全文,还标识了其他元素,没有做到唯一定位)
    if(flag and nodes[i].find_element_by_css_selector("p>a[action-type='fl_unfold']").text.startswith('展开全文c')):
        nodes[i].find_element_by_css_selector("p>a[action-type='fl_unfold']").click()
        comment.append(nodes[i].find_element_by_css_selector('p[node-type="feed_list_content_full"]').text)
    else:
        comment.append(nodes[i].find_element_by_css_selector('p[node-type="feed_list_content"]').text)
    username.append(nodes[i].find_element_by_css_selector("div.info>div:nth-child(2)>a").text)

'''循环操作,获取剩余页数的数据'''
for page in range(49):
    print(page)
    # 定位下一页按钮
    nextpage_button = driver.find_element_by_link_text('下一页')
    #点击按键
    driver.execute_script("arguments[0].click();", nextpage_button)
    wait = WebDriverWait(driver,5)
    #与前面类似
    nodes1 = driver.find_elements_by_css_selector('div.card > div.card-feed > div.content')
    for i in range(0,len(nodes1),1):
        flag = False
        try:
            nodes1[i].find_element_by_css_selector("p>a[action-type='fl_unfold']").is_displayed()
            flag = True

        except:
            flag = False
        if (flag and nodes1[i].find_element_by_css_selector("p>a[action-type='fl_unfold']").text.startswith('展开全文c')):
            nodes1[i].find_element_by_css_selector("p>a[action-type='fl_unfold']").click()
            comment.append(nodes1[i].find_element_by_css_selector('p[node-type="feed_list_content_full"]').text)
        else:
            comment.append(nodes1[i].find_element_by_css_selector('p[node-type="feed_list_content"]').text)
        username.append(nodes1[i].find_element_by_css_selector("div.info>div:nth-child(2)>a").text)

'''保存数据'''
data = pd.DataFrame({'username':username,'comment':comment})
data.to_excel("weibo.xlsx")
到此这篇关于使用Selenium实现微博爬虫(预登录、展开全文、翻页)的文章就介绍到这了,更多相关Selenium 微博爬虫 内容请搜索python博客以前的文章或继续浏览下面的相关文章希望大家以后多多支持python博客!
- << 上一篇 下一篇 >>
使用Selenium实现微博爬虫(预登录、展开全文、翻页)
看: 1748次 时间:2021-04-26 分类 : python爬虫
- 相关文章
- 2021-07-20Python爬虫基础之爬虫的分类知识总结
- 2021-07-20Python爬虫基础讲解之请求
- 2021-07-20PyQt5爬取12306车票信息程序的实现
- 2021-07-20Python爬虫之m3u8文件里提取小视频的正确姿势
- 2021-07-20如何用python抓取B站数据
- 2021-07-20快速搭建python爬虫管理平台
- 2021-07-20Python爬虫之获取心知天气API实时天气数据并弹窗提醒
- 2021-07-20Python爬虫之批量下载喜马拉雅音频
- 2021-07-20python使用pywinauto驱动微信客户端实现公众号爬虫
- 2021-07-20Requests什么的通通爬不了的Python超强反爬虫方案!
-
搜索
-
-
推荐资源
-
Powered By python教程网 鲁ICP备18013710号
python博客 - 小白学python最友好的网站!