前言
本文将使用pytorch框架的目标识别技术实现滑块验证码的破解。我们这里选择了yolov5算法
例:输入图像

输出图像

可以看到经过检测之后,我们能很准确的定位到缺口的位置,并且能得到缺口的坐标,这样一来我们就能很轻松的实现滑动验证码的破解。
一.前期工作
yolov系列是常用的目标检测算法,yolov5不仅配置简单,而且在速度上也有不小的提升,我们很容易就能训练我们自己的数据集。
YOLOV5 Pytorch版本GIthub网址感谢这位作者的代码。下载之后,是这样的格式
---data/
Annotations/ 存放图片的标注文件(.xml)
images/ 存放待训练的图片
ImageSets/ 存放划分数据集的文件
labels/ 存放图片的方框信息
其中只需要修改Annotations和images两个文件夹。
首先我们将待训练的图片放入images数据集要感谢这位大神的整理https://github.com/tzutalin/labelImg,在这个基础上我增加了50张来自腾讯的验证码图片
数据集已上传百度云
链接: https://pan.baidu.com/s/1XS5KVoXqGHglfP0mZ3HJLQ
提取码: wqi8
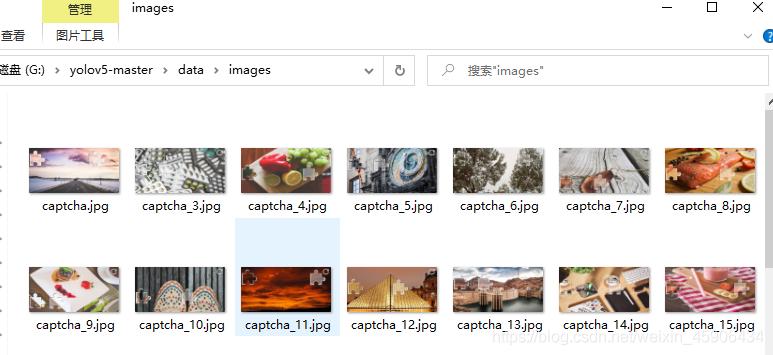
然后我们需要对其进行标注,告诉计算机我们希望它识别什么内容。这时候我们需要精灵标注这款软件。免费而且功能强大,五星好评!
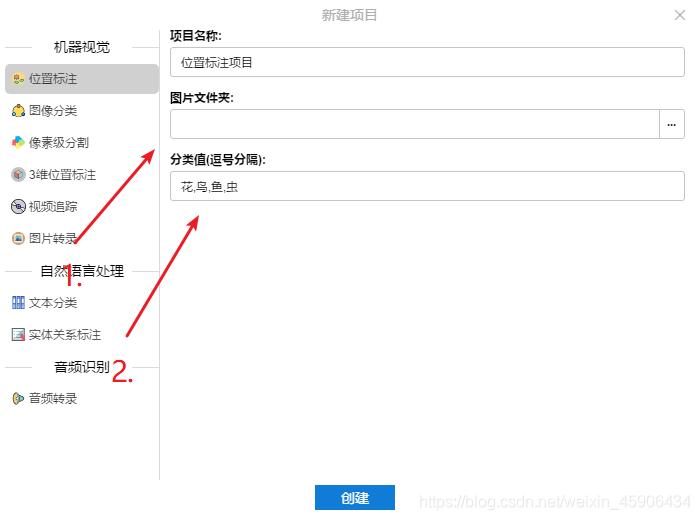
第一步选择images文件夹,第二步有几类就写几类,建议用英文。这里只有一类,即为缺失快的位置,命名为target。注意标注的时候要左右恰好卡住,不然获得的坐标就不精准。
标注完成后,点击导出,文件格式不用动,直接点确定,就会在images/outputs文件夹生成我们的标注文件。全部复制到Annotations文件夹即可。
回到主目录,运行makeTxt.py和voc_label.py,makeTxt直接运行即可,voc_label需要修改classes的值,这次只有一target
import xml.etree.ElementTree as ET
import pickle
import os
# os.listdir() 方法用于返回指定的文件夹包含的文件或文件夹的名字的列表
from os import listdir, getcwd
from os.path import join


sets = ['train', 'test', 'val']
classes = ['target'] #之前标注时有几个类,这里就输入几个类

"""

............

"""
进入data文件夹,修改coco.yaml的内容
# COCO 2017 dataset http://cocodataset.org
# Download command: bash yolov5/data/get_coco2017.sh
# Train command: python train.py --data ./data/coco.yaml
# Dataset should be placed next to yolov5 folder:
#  /parent_folder
#   /coco
#   /yolov5


# train and val datasets (image directory or *.txt file with image paths)
train: ../coco/train2017.txt # 118k images
val: ../coco/val2017.txt # 5k images
test: ../coco/test-dev2017.txt # 20k images for submission to https://competitions.codalab.org/competitions/20794

# number of classes
nc: 1

# class names
names: ['target']

# Print classes
# with open('data/coco.yaml') as f:
#  d = yaml.load(f, Loader=yaml.FullLoader) # dict
#  for i, x in enumerate(d['names']):
#   print(i, x)
再进入models文件夹,修改yolov5s.yaml的内容
nc: 1 # number of classes
depth_multiple: 0.33 # model depth multiple
width_multiple: 0.50 # layer channel multiple
"""
''''''''''''
"""
至此配置环节终于结束了,可以开始训练了!
打开train.py,我们一般只需要修改–weights,–cfg,–data,–epochs几个设置即可
parser = argparse.ArgumentParser()
parser.add_argument('--weights', type=str, default='yolov5s.pt', help='initial weights path')
parser.add_argument('--cfg', type=str, default='models/yolov5s.yaml', help='model.yaml path')
parser.add_argument('--data', type=str, default='data/coco.yaml', help='data.yaml path')
parser.add_argument('--hyp', type=str, default='data/hyp.scratch.yaml', help='hyperparameters path')
parser.add_argument('--epochs', type=int, default=300)
parser.add_argument('--batch-size', type=int, default=16, help='total batch size for all GPUs')
parser.add_argument('--img-size', nargs='+', type=int, default=[640, 640], help='[train, test] image sizes')
parser.add_argument('--rect', action='store_true', help='rectangular training')
parser.add_argument('--resume', nargs='?', const=True, default=False, help='resume most recent training')
parser.add_argument('--nosave', action='store_true', help='only save final checkpoint')
parser.add_argument('--notest', action='store_true', help='only test final epoch')
parser.add_argument('--noautoanchor', action='store_true', help='disable autoanchor check')
parser.add_argument('--evolve', action='store_true', help='evolve hyperparameters')
parser.add_argument('--bucket', type=str, default='', help='gsutil bucket')
parser.add_argument('--cache-images', action='store_true', help='cache images for faster training')
parser.add_argument('--image-weights', action='store_true', help='use weighted image selection for training')
parser.add_argument('--device', default='', help='cuda device, i.e. 0 or 0,1,2,3 or cpu')
parser.add_argument('--multi-scale', action='store_true', help='vary img-size +/- 50%%')
parser.add_argument('--single-cls', action='store_true', help='train multi-class data as single-class')
parser.add_argument('--adam', action='store_true', help='use torch.optim.Adam() optimizer')
parser.add_argument('--sync-bn', action='store_true', help='use SyncBatchNorm, only available in DDP mode')
parser.add_argument('--local_rank', type=int, default=-1, help='DDP parameter, do not modify')
parser.add_argument('--log-imgs', type=int, default=16, help='number of images for W&B logging, max 100')
parser.add_argument('--log-artifacts', action='store_true', help='log artifacts, i.e. final trained model')
parser.add_argument('--workers', type=int, default=4, help='maximum number of dataloader workers')
parser.add_argument('--project', default='runs/train', help='save to project/name')
parser.add_argument('--name', default='exp', help='save to project/name')
parser.add_argument('--exist-ok', action='store_true', help='existing project/name ok, do not increment')
opt = parser.parse_args()
直接运行train.py,开始训练!
。。。。。。。。。。。。。。。。训练完成后,进入runs/train/exp/weights,我们复制best.pt到主目录。
最后,我们打开datect.py,修改几个属性
parser = argparse.ArgumentParser()
  parser.add_argument('--weights', nargs='+', type=str, default='best.pt', help='model.pt path(s)')
  parser.add_argument('--source', type=str, default='test.jpg', help='source') # file/folder, 0 for webcam
  parser.add_argument('--img-size', type=int, default=640, help='inference size (pixels)')
  parser.add_argument('--conf-thres', type=float, default=0.25, help='object confidence threshold')
  parser.add_argument('--iou-thres', type=float, default=0.45, help='IOU threshold for NMS')
  parser.add_argument('--device', default='0', help='cuda device, i.e. 0 or 0,1,2,3 or cpu')
  parser.add_argument('--view-img', action='store_true', help='display results')
  parser.add_argument('--save-txt', action='store_true', help='save results to *.txt')
  parser.add_argument('--save-conf', action='store_true', help='save confidences in --save-txt labels')
  parser.add_argument('--classes', nargs='+', type=int, help='filter by class: --class 0, or --class 0 2 3')
  parser.add_argument('--agnostic-nms', action='store_true', help='class-agnostic NMS')
  parser.add_argument('--augment', action='store_true', help='augmented inference')
  parser.add_argument('--update', action='store_true', help='update all models')
  parser.add_argument('--project', default='runs/detect', help='save results to project/name')
  parser.add_argument('--name', default='exp', help='save results to project/name')
  parser.add_argument('--exist-ok', action='store_true', help='existing project/name ok, do not increment')
  opt = parser.parse_args()
–source属性我们可以先修改为data/images,对自己的数据集进行识别看看能否正常识别。
小Tips,如果执行后不报错,但没有检测框的话,试试看修改–device为cpu,cuda版本太低会导致使用gpu没有检测框(问就是被这个小问题迫害了很久 --_–)。最后在112行左右的位置,添加一个print

这时执行程序就会返回方框的位置信息和自信度了

我们的前驱工作终于完成了~
二.编写爬虫
1.寻找合适的网站
经过一番搜寻,最后锁定了https://007.qq.com/online.html
因为它的网站结构很方便我们的操作。
2.导入依赖库
这里我们采用selenium来模拟人类的操作。
关于selenium的安装和webdriver的安装方法本文不作延伸。from selenium import webdriver from selenium.webdriver.common.action_chains import ActionChains import requests,re import os import requests import re import time from selenium.webdriver import ActionChains3.编写破解程序
访问网站,发现破解之前要依次点击
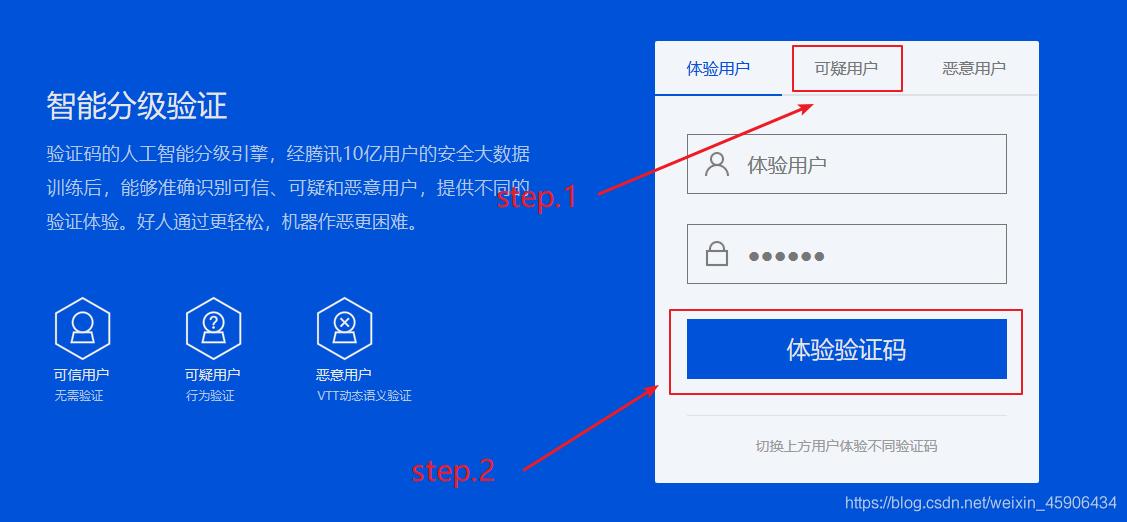
编写代码
def run() driver = webdriver.Chrome() headers = {"User-Agent":"Mozilla/5.0 (Windows NT 10.0; Win64; x64) AppleWebKit/537.36 (KHTML, like Gecko) Chrome/80.0.3987.106 Safari/537.36"} #伪装请求头 driver.get('https://007.qq.com/online.html') #访问网站 driver.find_element_by_xpath('/html/body/div[1]/section[1]/div/div/div/div[2]/div[1]/a[2]').click() driver.find_element_by_xpath('//*[@id="code"]').click() #模拟点击操作继续

这里便是我们要识别的图片,不过直接定位的话并不能定位到,因为这段代码是由iframe包裹着的,我们需要先定位到这个iframe
time.sleep(2) #休眠2秒,防止报错 driver.switch_to_frame("tcaptcha_iframe") #根据iframe的id定位到iframe target = driver.find_element_by_xpath("/html/body/div/div[3]/div[2]/div[1]/div[2]/img").get_attribute("src") #得到图片的原地址 response = requests.get(target,headers=headers)#访问图片地址 img = response.content with open( 'test.jpg','wb' ) as f: f.write(img)#将图片保存到主目录,命名为test.jpg现在图片也有了,检测程序也准备好了,那么开始检测吧!
''' os.popen()的用法,简单来说就是执行cmd命令,并得到cmd的返回值 这里是执行detect.py ''' result = os.popen("python detect.py").readlines() #执行目标检测程序 list = [] for line in result: list.append(line) #将cmd的返回信息存入列表 print(list) a = re.findall("(.*):(.*]).(.*)\\n",list[-4]) #获得图片的位置信息 print(a) print(len(a)) if len(a) != 0: #如果能检测到方框 tensor=a[0][1] pro = a[0][2] list_=tensor[2:-1].split(",") location = [] for i in list_: print(i) b = re.findall("tensor(.*)",i)[0] location.append(b[1:-2]) #提取出来方框左上角的xy和右下角的xy drag1 = driver.find_element_by_xpath('/html/body/div/div[3]/div[2]/div[2]/div[2]/div[1]') #定位到拖动按钮处 action_chains = ActionChains(driver) #实例化鼠标操作类 action_chains.drag_and_drop_by_offset(drag1, int(int(location[2])/2-85), 0).perform() #模拟鼠标按住并拖动距离 X 后再放开 input("等待操作") driver.quit() else: driver.quit() print("未能识别")这里着重说一下
action_chains.drag_and_drop_by_offset(drag1, int(int(location[2])/2-85), 0).perform()为什么要拖
int(int(location[2])/2-85)远。首先
location这个列表的格式为[左上x,左上y,右下x,右下y],location[2]即为取出右下角的x值。我们保存到本地的验证码图片分辨率如下

但网站显示的图片大小
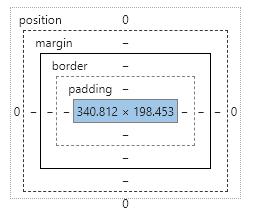
x轴刚好为本地图片的一半,所以int(location[2]/2)得到的便是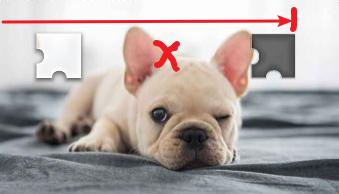
但是待拖动的方块本身距离左边还有一定距离,通过分析发现
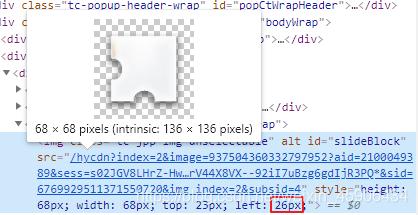
这个小方块的最左边距离图片的最左边的距离即为红框中的26,即
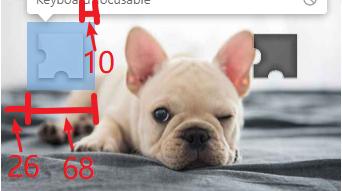
26+68-10=84,因为这个10是试出来的长度,我们就令这段距离为85吧
至此
int(int(location[2])/2-85)的由来也解释清楚了。
大功告成啦,那让我们看一遍演示吧!
selenium完整代码如下
from selenium import webdriver from selenium.webdriver.common.action_chains import ActionChains import requests,re import os import requests import re import time from selenium.webdriver import ActionChains def run() driver = webdriver.Chrome() headers = {"User-Agent":"Mozilla/5.0 (Windows NT 10.0; Win64; x64) AppleWebKit/537.36 (KHTML, like Gecko) Chrome/80.0.3987.106 Safari/537.36"} #伪装请求头 driver.get('https://007.qq.com/online.html') #访问网站 driver.find_element_by_xpath('/html/body/div[1]/section[1]/div/div/div/div[2]/div[1]/a[2]').click() driver.find_element_by_xpath('//*[@id="code"]').click() #模拟点击操作 time.sleep(2) #休眠2秒,防止报错 driver.switch_to_frame("tcaptcha_iframe") #根据iframe的id定位到iframe target = driver.find_element_by_xpath("/html/body/div/div[3]/div[2]/div[1]/div[2]/img").get_attribute("src") #得到图片的原地址 response = requests.get(target,headers=headers)#访问图片地址 img = response.content with open( 'test.jpg','wb' ) as f: f.write(img)#将图片保存到主目录,命名为test.jpg ''' os.popen()的用法,简单来说就是执行cmd命令,并得到cmd的返回值 这里是执行detect.py ''' result = os.popen("python detect.py").readlines() #执行目标检测程序 list = [] for line in result: list.append(line) #将cmd的返回信息存入列表 print(list) a = re.findall("(.*):(.*]).(.*)\\n",list[-4]) #获得图片的位置信息 print(a) print(len(a)) if len(a) != 0: #如果能检测到方框 tensor=a[0][1] pro = a[0][2] list_=tensor[2:-1].split(",") location = [] for i in list_: print(i) b = re.findall("tensor(.*)",i)[0] location.append(b[1:-2]) #提取出来方框左上角的xy和右下角的xy drag1 = driver.find_element_by_xpath('/html/body/div/div[3]/div[2]/div[2]/div[2]/div[1]') #定位到拖动按钮处 action_chains = ActionChains(driver) #实例化鼠标操作类 action_chains.drag_and_drop_by_offset(drag1, int(int(location[2])/2-85), 0).perform() #模拟鼠标按住并拖动距离 X 后再放开 input("等待操作") driver.quit() else: driver.quit() print("未能识别") while True: run()到此这篇关于基于Pytorch版yolov5的滑块验证码破解思路详解的文章就介绍到这了,更多相关Pytorch滑块验证码破解内容请搜索python博客以前的文章或继续浏览下面的相关文章希望大家以后多多支持python博客!
- << 上一篇 下一篇 >>
基于Pytorch版yolov5的滑块验证码破解思路详解
看: 3098次 时间:2021-03-18 分类 : python教程
- 相关文章
- 2021-12-20Python 实现图片色彩转换案例
- 2021-12-20python初学定义函数
- 2021-12-20图文详解Python如何导入自己编写的py文件
- 2021-12-20python二分法查找实例代码
- 2021-12-20Pyinstaller打包工具的使用以及避坑
- 2021-12-20Facebook开源一站式服务python时序利器Kats详解
- 2021-12-20pyCaret效率倍增开源低代码的python机器学习工具
- 2021-12-20python机器学习使数据更鲜活的可视化工具Pandas_Alive
- 2021-12-20python读写文件with open的介绍
- 2021-12-20Python生成任意波形并存为txt的实现
-
搜索
-
-
推荐资源
-
Powered By python教程网 鲁ICP备18013710号
python博客 - 小白学python最友好的网站!