本人在此就不搬运书上关于密度聚类的理论知识了,仅仅实现密度聚类的模板代码和调用skelarn的密度聚类算法。
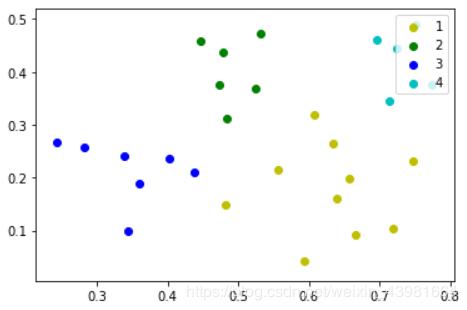
有人好奇,为什么有sklearn库了还要自己去实现呢?其实,库的代码是比自己写的高效且容易,但自己实现代码会对自己对算法的理解更上一层楼。#调用科学计算包与绘图包 import numpy as np import random import matplotlib.pyplot as plt# 获取数据 def loadDataSet(filename): dataSet=np.loadtxt(filename,dtype=np.float32,delimiter=',') return dataSet#计算两个向量之间的欧式距离 def calDist(X1 , X2 ): sum = 0 for x1 , x2 in zip(X1 , X2): sum += (x1 - x2) ** 2 return sum ** 0.5#获取一个点的ε-邻域(记录的是索引) def getNeibor(data , dataSet , e): res = [] for i in range(dataSet.shape[0]): if calDist(data , dataSet[i])<e: res.append(i) return res#密度聚类算法 def DBSCAN(dataSet , e , minPts): coreObjs = {}#初始化核心对象集合 C = {} n = dataSet.shape[0] #找出所有核心对象,key是核心对象的index,value是ε-邻域中对象的index for i in range(n): neibor = getNeibor(dataSet[i] , dataSet , e) if len(neibor)>=minPts: coreObjs[i] = neibor oldCoreObjs = coreObjs.copy() k = 0#初始化聚类簇数 notAccess = list(range(n))#初始化未访问样本集合(索引) while len(coreObjs)>0: OldNotAccess = [] OldNotAccess.extend(notAccess) cores = coreObjs.keys() #随机选取一个核心对象 randNum = random.randint(0,len(cores)-1) cores=list(cores) core = cores[randNum] queue = [] queue.append(core) notAccess.remove(core) while len(queue)>0: q = queue[0] del queue[0] if q in oldCoreObjs.keys() : delte = [val for val in oldCoreObjs[q] if val in notAccess]#Δ = N(q)∩Γ queue.extend(delte)#将Δ中的样本加入队列Q notAccess = [val for val in notAccess if val not in delte]#Γ = Γ\Δ k += 1 C[k] = [val for val in OldNotAccess if val not in notAccess] for x in C[k]: if x in coreObjs.keys(): del coreObjs[x] return C# 代码入口 dataSet = loadDataSet(r"E:\jupyter\sklearn学习\sklearn聚类\DataSet.txt") print(dataSet) print(dataSet.shape) C = DBSCAN(dataSet, 0.11, 5) draw(C, dataSet)结果图:

下面是调用sklearn库的实现
db = skc.DBSCAN(eps=1.5, min_samples=3).fit(dataSet) #DBSCAN聚类方法 还有参数,matric = ""距离计算方法
labels = db.labels_ #和X同一个维度,labels对应索引序号的值 为她所在簇的序号。若簇编号为-1,表示为噪声
print('每个样本的簇标号:')
print(labels)
raito = len(labels[labels[:] == -1]) / len(labels) #计算噪声点个数占总数的比例
print('噪声比:', format(raito, '.2%'))
n_clusters_ = len(set(labels)) - (1 if -1 in labels else 0) # 获取分簇的数目
print('分簇的数目: %d' % n_clusters_)
print("轮廓系数: %0.3f" % metrics.silhouette_score(X, labels)) #轮廓系数评价聚类的好坏
for i in range(n_clusters_):
  print('簇 ', i, '的所有样本:')
  one_cluster = X[labels == i]
  print(one_cluster)
  plt.plot(one_cluster[:,0],one_cluster[:,1],'o')
plt.show()
到此这篇关于python实现密度聚类(模板代码+sklearn代码)的文章就介绍到这了,更多相关python 密度聚类内容请搜索python博客以前的文章或继续浏览下面的相关文章希望大家以后多多支持python博客!
-
<< 上一篇 下一篇 >>
标签:numpy matplotlib
python实现密度聚类(模板代码+sklearn代码)
看: 1401次 时间:2020-07-13 分类 : python爬虫
- 相关文章
- 2021-07-20Python爬虫基础之爬虫的分类知识总结
- 2021-07-20Python爬虫基础讲解之请求
- 2021-07-20PyQt5爬取12306车票信息程序的实现
- 2021-07-20Python爬虫之m3u8文件里提取小视频的正确姿势
- 2021-07-20如何用python抓取B站数据
- 2021-07-20快速搭建python爬虫管理平台
- 2021-07-20Python爬虫之获取心知天气API实时天气数据并弹窗提醒
- 2021-07-20Python爬虫之批量下载喜马拉雅音频
- 2021-07-20python使用pywinauto驱动微信客户端实现公众号爬虫
- 2021-07-20Requests什么的通通爬不了的Python超强反爬虫方案!
-
搜索
-
-
推荐资源
-
Powered By python教程网 鲁ICP备18013710号
python博客 - 小白学python最友好的网站!