一、将原图粘贴到一张正方形的背景上
python
def trans_square(image):
  r"""Open the image using PIL."""
  image = image.convert('RGB')
  w, h = image.size
  background = Image.new('RGB', size=(max(w, h), max(w, h)), color=(127, 127, 127)) # 创建背景图,颜色值为127
  length = int(abs(w - h) // 2) # 一侧需要填充的长度
  box = (length, 0) if w < h else (0, length) # 粘贴的位置
  background.paste(image, box)
  return background
二、切片填充的方式使用numpy创建背景,使用切片将原图的值填充到背景中。
python
 def trans_square(image):
  r"""Open the image using PIL."""
    img = image.convert('RGB')
    img = np.array(img, dtype=np.uint8) # 图片转numpy
    img_h, img_w, img_c = img.shape
    if img_h != img_w:
      long_side = max(img_w, img_h)
      short_side = min(img_w, img_h)
      loc = abs(img_w - img_h) // 2
      img = img.transpose((1, 0, 2)) if img_w < img_h else img # 如果高是长边则换轴,最后再换回来
      background = np.zeros((long_side, long_side, img_c), dtype=np.uint8) # 创建正方形背景
      background[loc: loc + short_side] = img[...] # 数据填充在中间位置
      img = background.transpose((1, 0, 2)) if img_w < img_h else background
    return Image.fromarray(img, 'RGB')
使用 nn.ZeroPad2d() 或者 nn.ConstantPad2d() 进行填充
python
def trans_square(image):
  r"""transform square.
  :return PIL image
  """
  img = transforms.ToTensor()(image)
  C, H, W = img.shape
  pad_1 = int(abs(H - W) // 2) # 一侧填充长度
  pad_2 = int(abs(H - W) - pad_1) # 另一侧填充长度
  img = img.unsqueeze(0) # 加轴
  if H > W:
    img = nn.ZeroPad2d((pad_1, pad_2, 0, 0))(img) # 左右填充,填充值是0
    # img = nn.ConstantPad2d((pad_1, pad_2, 0, 0), 127)(img) # 左右填充,填充值是127
  elif H < W:
    img = nn.ZeroPad2d((0, 0, pad_1, pad_2))(img) # 上下填充,填充值是0
    # img = nn.ConstantPad2d((0, 0, pad_1, pad_2), 127)(img) # 上下填充,填充值是127
  img = img.squeeze(0) # 减轴
  img = transforms.ToPILImage()(img)
  return img
ps:下面看下python 将图片转换成九宫格形式
用到的模块PIL(安装:
pip install pillow)完整代码:
```python
from PIL import Image import sys先将 input image 填充为正方形
def fill_image(image): width, height = image.size
#选取长和宽中较大值作为新图片的 new_image_length = width if width > height else height
#生成新图片[白底] new_image = Image.new(image.mode, (new_image_length, new_image_length), color='white') #注意这个函数! #将之前的图粘贴在新图上,居中
if width > height:#原图宽大于高,则填充图片的竖直维度 #(x,y)二元组表示粘贴上图相对下图的起始位置,是个坐标点。 new_image.paste(image, (0, int((new_image_length - height) / 2))) else: new_image.paste(image, (int((new_image_length - width) / 2),0))
return new_image def cut_image(image): width, height = image.size item_width = int(width / 3) box_list = [] # (left, upper, right, lower) for i in range(0,3): for j in range(0,3): #print((iitem_width,jitem_width,(i+1)item_width,(j+1)item_width)) box = (jitem_width,iitem_width,(j+1)item_width,(i+1)item_width) box_list.append(box) image_list = [image.crop(box) for box in box_list] return image_list保存
def save_images(image_list): index = 1
for image in image_list: image.save(str(index) + '.png', 'PNG') index += 1 if name == 'main': file_path = "***"#填入图片名 image = Image.open(file_path)
#image.show() image = fill_image(image) image_list = cut_image(image) save_images(image_list) ```原图:

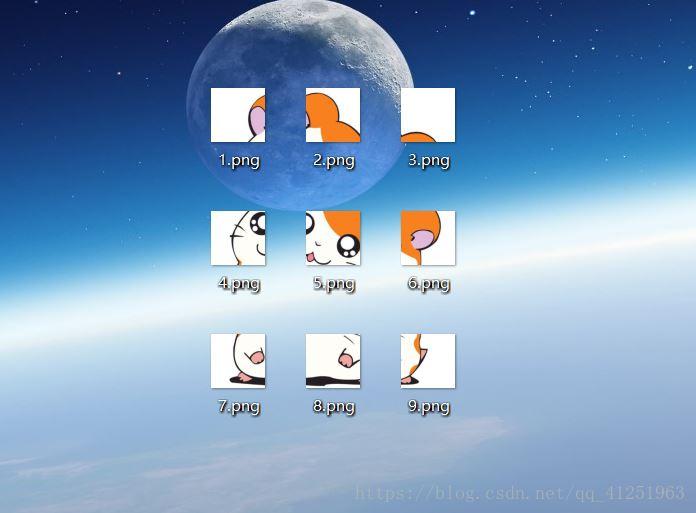
运行程序后效果图:
到此这篇关于使用Python将图片转正方形的两种方法的文章就介绍到这了,更多相关python 图片转正方形内容请搜索python博客以前的文章或继续浏览下面的相关文章希望大家以后多多支持python博客!
-
<< 上一篇 下一篇 >>
标签:numpy
使用Python将图片转正方形的两种方法实例代码详解
看: 1878次 时间:2020-07-13 分类 : python教程
- 相关文章
- 2021-12-20Python 实现图片色彩转换案例
- 2021-12-20python初学定义函数
- 2021-12-20图文详解Python如何导入自己编写的py文件
- 2021-12-20python二分法查找实例代码
- 2021-12-20Pyinstaller打包工具的使用以及避坑
- 2021-12-20Facebook开源一站式服务python时序利器Kats详解
- 2021-12-20pyCaret效率倍增开源低代码的python机器学习工具
- 2021-12-20python机器学习使数据更鲜活的可视化工具Pandas_Alive
- 2021-12-20python读写文件with open的介绍
- 2021-12-20Python生成任意波形并存为txt的实现
-
搜索
-
-
推荐资源
-
Powered By python教程网 鲁ICP备18013710号
python博客 - 小白学python最友好的网站!