前端时间智能信息处理实训,我选择的课题为身份证号码识别,对中华人民共和国公民身份证进行识别,提取并识别其中的身份证号码,将身份证号码识别为字符串的形式输出。现在实训结束了将代码发布出来供大家参考,识别的方式并不复杂,并加了一些注释,如果有什么问题可共同讨论。最后重要的事情说三遍:请勿直接抄袭,请勿直接抄袭,请勿直接抄袭!尤其是我的学弟学妹们,还是要自己做的,小心直接拿我的用被老师发现了挨批^_^。
实训环境:CentOS-7.5.1804 + Python-3.6.6 + Opencv-3.4.1
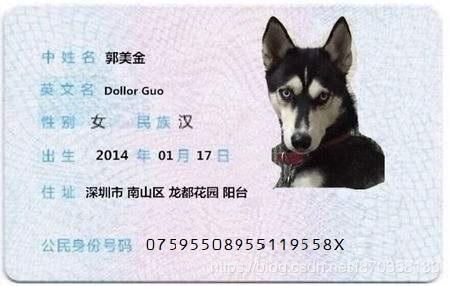
做测试用的照片以及数字识别匹配使用的模板(自制)提供给大家,通过查询得到,身份证号码使用的字体格式为OCR-B 10 BT格式,实训中用到的身份证图片为训练测试图片,有一部分是老师当时直接给出的,还有一部分是我自己用自己身份证做的测试和从网上找到了一张,由于部分身份证号码不是标准字体格式,对识别造成影响,所以有部分图片我还提前ps了一下。


流程图
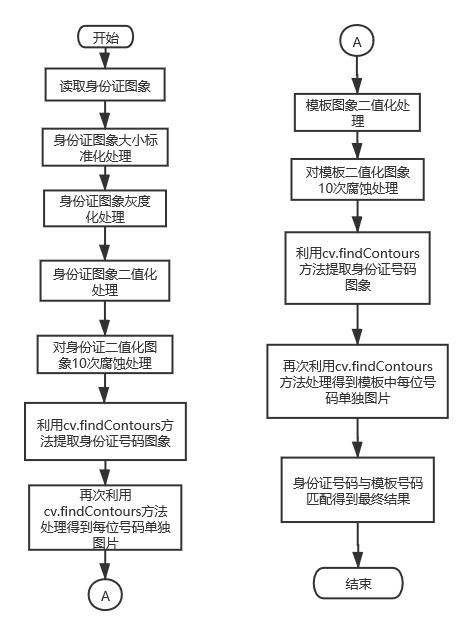
前期处理的部分不在描述,流程图和代码注释中都有。其实整个过程并不是很复杂,本来想过在数字识别方面用现成的一些方法,或者想要尝试用到卷积神经网络(CNN)然后做训练集来识别。后来在和老师交流的时候,老师给出建议可以尝试使用特征点匹配或者其他类方法。根据最后数字分割出来单独显示的效果,想到了一个适合于我代码情况的简单方法。
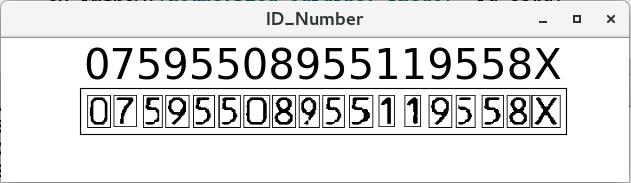
建立一个标准号码库(利用上面自制模板数字分割后获得),然后用每一个号码图片与库中所有标准号码图片做相似度匹配,和哪一个模板相似度最高,则说明该图片为哪一位号码。在将模板号码分割成功后,最关键的一步就是进行相似度匹配。为提高匹配的精确度和效率,首先利用cv.resize()将前面被提取出的每位身份证号码以及标准号码库中的号码做图像大小调整,统一将图像均调整为12x18像素的大小,图像大小的选择是经过慎重的考虑的,如果太大则计算过程耗时,如果过小则可能存在较大误差。匹配的具体方案为:记录需要识别的图片与每个模板图片中有多少位置的像素点相同,相同的越多,说明相似度越高,也就最有可能是某个号码。最终将18位号码都识别完成后,得到的具体的相似度矩阵。
具体代码如下所示:
import cv2 as cv
import numpy as np
import matplotlib.pyplot as plt

# 将身份证号码区域从身份证中提取出
def Extract(op_image, sh_image):

 binary, contours, hierarchy = cv.findContours(op_image,
  cv.RETR_TREE, cv.CHAIN_APPROX_SIMPLE)
 contours.remove(contours[0])
 max_x, max_y, max_w, max_h = cv.boundingRect(contours[0])
 color = (0, 0, 0)
 for c in contours:
 x, y, w, h = cv.boundingRect(c)
 cv.rectangle(op_image, (x, y), (x + w, y + h), color, 1)
 cv.rectangle(sh_image, (x, y), (x + w, y + h), color, 1)
 if max_w < w:
  max_x = x
  max_y = y
  max_w = w
  max_h = h
 cut_img = sh_image[max_y:max_y+max_h, max_x:max_x+max_w]
 cv.imshow("The recognized enlarged image", op_image)
 cv.waitKey(0)
 cv.imshow("The recognized binary image", sh_image)
 cv.waitKey(0)
 return cut_img

# 号码内部区域填充(未继续是用此方法)
def Area_filling(image, kernel):
 # The boundary image
 iterate = np.zeros(image.shape, np.uint8)
 iterate[:, 0] = image[:, 0]
 iterate[:, -1] = image[:, -1]
 iterate[0, :] = image[0, :]
 iterate[-1, :] = image[-1, :]
 while True:
 old_iterate = iterate
 iterate_dilation = cv.dilate(iterate, kernel, iterations=1)
 iterate = cv.bitwise_and(iterate_dilation, image)
 difference = cv.subtract(iterate, old_iterate)
 # if difference is all zeros it will return False
 if not np.any(difference):
  break
 return iterate

# 将身份证号码区域再次切割使得一张图片一位号码
def Segmentation(cut_img, kernel, n):
 #首先进行一次号码内空白填充(效果不佳,放弃)
 #area_img = Area_filling(cut_img, kernel)
 #cv.imshow("area_img", area_img)
 #cv.waitKey(0)
 #dilate = cv.dilate(area_img, kernel, iterations=1)
 #cv.imshow("dilate", dilate)
 #cv.waitKey(0)

 cut_copy = cut_img.copy()
 binary, contours, hierarchy = cv.findContours(cut_copy, cv.RETR_TREE, cv.CHAIN_APPROX_SIMPLE)
 contours.remove(contours[0])
 for c in contours:
 x, y, w, h = cv.boundingRect(c)
 for i in range(h):
  for j in range(w):
  # 把首次用findContours()方法识别的轮廓内区域置黑色
  cut_copy[y + i, x + j] = 0
  # cv.rectangle(cut_copy, (x, y), (x + w, y + h), color, 1)
 cv.imshow("Filled image", cut_copy)
 cv.waitKey(0)

 # 尝试进行分割
 binary, contours, hierarchy = cv.findContours(cut_copy, cv.RETR_TREE, cv.CHAIN_APPROX_SIMPLE)
 #tmp_img = cut_img.copy()
 # 如果识别的轮廓数量不是n+1位(首先是一个整个区域的轮廓,然后是n位号码各自的轮廓,身份证和匹配模板分割均用此方法)
 while len(contours)!=n+1:
 if len(contours) < n+1:
  # 如果提取的轮廓数量小于n+1, 说明可能有两位数被识别到一个轮廓中,做一次闭运算,消除数位之间可能存在的连接部分,然后再次尝试提取
  #cut_copy = cv.dilate(cut_copy, kernel, iterations=1)
  cut_copy = cv.morphologyEx(cut_copy, cv.MORPH_CLOSE, kernel)
  cv.imshow("cut_copy", cut_copy)
  cv.waitKey(0)
  # 再次尝试提取身份证区域的轮廓并将轮廓内区域用黑色覆盖
  binary, contours, hierarchy = cv.findContours(cut_copy, cv.RETR_TREE, cv.CHAIN_APPROX_SIMPLE)
  # 去掉提取出的第一个轮廓(第一个轮廓为整张图片)
  contours.remove(contours[0])
  for c in contours:
  x, y, w, h = cv.boundingRect(c)
  for i in range(h):
   for j in range(w):
   cut_copy[y + i, x + j] = 0
   # cv.rectangle(cut_copy, (x, y), (x + w, y + h), color, 1)
  cv.imshow("Filled image", cut_copy)
  cv.waitKey(0)
  #如果findContours()结果为n,跳出
  if len(contours) == n:
  break

 elif len(contours) > n+1:
  # 如果提取的轮廓数量大于n+1, 说明可能有一位数被识别到两个轮廓中,做一次开运算,增强附近身份证区域部分之间的连接部分,然后再次尝试提取
  #cut_copy = cv.erode(cut_copy, kernel, iterations=1)
  cut_copy = cv.morphologyEx(cut_copy, cv.MORPH_OPEN, kernel2)
  cv.imshow("cut_copy", cut_copy)
  cv.waitKey(0)
  #再次尝试提取身份证区域的轮廓并将轮廓内区域用黑色覆盖
  binary, contours, hierarchy = cv.findContours(cut_copy, cv.RETR_TREE, cv.CHAIN_APPROX_SIMPLE)
  #去掉提取出的第一个轮廓(第一个轮廓为整张图片)
  contours.remove(contours[0])
  for c in contours:
  x, y, w, h = cv.boundingRect(c)
  for i in range(h):
   for j in range(w):
   cut_copy[y + i, x + j] = 0
   # cv.rectangle(cut_copy, (x, y), (x + w, y + h), color, 1)
  #cv.imshow("cut_copy", cut_copy)
  #cv.waitKey(0)
  if len(contours) == n:
  break
 # 上述while()中循环完成后,处理的图像基本满足分割要求,进行最后的提取分割
 binary, contours, hierarchy = cv.findContours(cut_copy, cv.RETR_TREE, cv.CHAIN_APPROX_SIMPLE)
 contours.remove(contours[0])
 color = (0, 0, 0)
 for c in contours:
 x, y, w, h = cv.boundingRect(c)
 for i in range(h):
  for j in range(w):
  cv.rectangle(cut_copy, (x, y), (x + w, y + h), color, 1)
  cv.rectangle(cut_img, (x, y), (x + w, y + h), color, 1)

 cv.imshow("Filled image", cut_copy)
 cv.waitKey(0)
 cv.imshow("cut_img", cut_img)
 cv.waitKey(0)
 #print('number:', len(contours))
 # Returns the result of the split
 return contours
 #return cut_img

# Sort排序方法,先将图像分割,由于分割的先后顺序不是按照从左往右,根据横坐标大小将每位身份证号码图片进行排序
def sort(contours, image):
 tmp_num = []
 x_all = []
 x_sort = []
 for c in contours:
 x, y, w, h = cv.boundingRect(c)
 # 使用x坐标来确定身份证号码图片的顺序,把个图片坐标的x值放入x_sort中
 x_sort.append(x)
 # 建立一个用于索引x坐标的列表
 x_all.append(x)
 tmp_img = image[y+1:y+h-1, x+1:x+w-1]
 tmp_img = cv.resize(tmp_img, (40, 60))
 cv.imshow("Number", tmp_img)
 cv.waitKey(0)
 # 将分割的图片缩小至12乘18像素的大小,标准化同时节约模板匹配的时间
 tmp_img = cv.resize(tmp_img, (12, 18))
 tmp_num.append(tmp_img)
 # 利用x_sort排序,用x_all索引,对身份证号码图片排序
 x_sort.sort()
 num_img = []
 for x in x_sort:
 index = x_all.index(x)
 num_img.append(tmp_num[index])
 # 返回排序后图片列表
 return num_img

# 图像识别方法
def MatchImage(img_num, tplt_num):
 # IDnum用于存储最终的身份证字符串
 IDnum = ''
 # 身份证号码18位
 for i in range(18):
 # 存储最大相似度模板的索引以及最大相似度
 max_index = 0
 max_simil = 0
  # 模板有1~9,0,X共11个
 for j in range(11):
  # 存储身份证号码图片与模板之间的相似度
  simil = 0
  for y in range(18):
  for x in range(12):
   # 如果身份证号码图片与模板之间对应位置像素点相同,simil 值自加1
   if img_num[i][y,x] == tplt_num[j][y,x]:
   simil+=1
  if max_simil < simil:
  max_index = j
  max_simil = simil
  print(str(simil)+' ',end='')
 if max_index < 9:
  IDnum += str(max_index+1)
 elif max_index == 9:
  IDnum += str(0)
 else:
  IDnum += 'X'
 print()
 return IDnum

# 最终效果展示
def display(IDnum, image):
 image = cv.resize(image, (960, 90))
 plt.figure(num='ID_Number')
 plt.subplot(111), plt.imshow(image, cmap='gray'), plt.title(IDnum, fontsize=30), plt.xticks([]), plt.yticks([])
 plt.show()


if __name__ == '__main__':
 # 一共三张做测试用身份证图像
 path = 'IDcard01.jpg'
 #path = 'IDcard02.png'
 #path = 'IDcard.jpg'
 id_card = cv.imread(path, 0)
 cv.imshow('Original image', id_card)
 cv.waitKey(0)
 # 将图像转化成标准大小
 id_card = cv.resize(id_card,(1200, 820))
 cv.imshow('Enlarged original image', id_card)
 cv.waitKey(0)
 # 图像二值化
 ret, binary_img = cv.threshold(id_card, 127, 255, cv.THRESH_BINARY)
 cv.imshow('Binary image', binary_img)
 cv.waitKey(0)

 # RECTANGULAR
 kernel = cv.getStructuringElement(cv.MORPH_RECT, (3, 3))
 # RECTANGULAR
 kernel2 = cv.getStructuringElement(cv.MORPH_DILATE, (5, 5))
 #close_img = cv.morphologyEx(binary_img, cv.MORPH_CLOSE, kernel)
 # The corrosion treatment connects the ID Numbers
 erode = cv.erode(binary_img, kernel, iterations=10)
 cv.imshow('Eroded image', erode)
 cv.waitKey(0)

 cut_img = Extract(erode, binary_img.copy())
 cv.imshow("cut_img", cut_img)
 cv.waitKey(0)

 # 存储最终分割的轮廓
 contours = Segmentation(cut_img, kernel, 18)
 # 对图像进行分割并排序
 img_num = sort(contours, cut_img)

 # 识别用的模板
 tplt_path = '/home/image/Pictures/template.jpg'
 tplt_img = cv.imread(tplt_path, 0)
 #cv.imshow('Template image', tplt_img)
 #cv.waitKey(0)

 ret, binary_tplt = cv.threshold(tplt_img, 127, 255, cv.THRESH_BINARY)
 cv.imshow('Binary template image', binary_tplt)
 cv.waitKey(0)

 # 与身份证相同的分割方式
 contours = Segmentation(binary_tplt, kernel, 11)
 tplt_num = sort(contours, binary_tplt)
 # 最终识别出的身份证号码
 IDnum = MatchImage(img_num, tplt_num)
 print('\nID_Number is:', IDnum)
 # 图片展示
 display(IDnum, cut_img)
效果展示:
到此这篇关于Python+Opencv身份证号码区域提取及识别实现的文章就介绍到这了,更多相关Python+Opencv身份证号码区域提取及识别内容请搜索python博客以前的文章或继续浏览下面的相关文章希望大家以后多多支持python博客!
-
<< 上一篇 下一篇 >>
标签:numpy matplotlib
Python+Opencv身份证号码区域提取及识别实现
看: 1529次 时间:2020-10-11 分类 : python教程
- 相关文章
- 2021-12-20Python 实现图片色彩转换案例
- 2021-12-20python初学定义函数
- 2021-12-20图文详解Python如何导入自己编写的py文件
- 2021-12-20python二分法查找实例代码
- 2021-12-20Pyinstaller打包工具的使用以及避坑
- 2021-12-20Facebook开源一站式服务python时序利器Kats详解
- 2021-12-20pyCaret效率倍增开源低代码的python机器学习工具
- 2021-12-20python机器学习使数据更鲜活的可视化工具Pandas_Alive
- 2021-12-20python读写文件with open的介绍
- 2021-12-20Python生成任意波形并存为txt的实现
-
搜索
-
-
推荐资源
-
Powered By python教程网 鲁ICP备18013710号
python博客 - 小白学python最友好的网站!