之前已经介绍过人脸识别的基础概念,以及基于opencv的实现方式,今天,我们使用dlib来提取128维的人脸嵌入,并使用k临近值方法来实现人脸识别。
人脸识别系统的实现流程与之前是一样的,只是这里我们借助了dlib和face_recognition这两个库来实现。face_recognition是对dlib库的包装,使对dlib的使用更方便。所以首先要安装这2个库。
pip3 install dlib
pip3 install face_recognition
然后,还要安装imutils库
 pip3 install imutils
 ```

<p>我们看一下项目的目录结构:</p>
. ├── dataset │ ├── alan_grant [22 entries exceeds filelimit, not opening dir] │ ├── claire_dearing [53 entries exceeds filelimit, not opening dir] │ ├── ellie_sattler [31 entries exceeds filelimit, not opening dir] │ ├── ian_malcolm [41 entries exceeds filelimit, not opening dir] │ ├── john_hammond [36 entries exceeds filelimit, not opening dir] │ └── owen_grady [35 entries exceeds filelimit, not opening dir] ├── examples │ ├── example_01.png │ ├── example_02.png │ └── example_03.png ├── output │ ├── lunch_scene_output.avi │ └── webcam_face_recognition_output.avi ├── videos │ └── lunch_scene.mp4 ├── encode_faces.py ├── encodings.pickle ├── recognize_faces_image.py ├── recognize_faces_video_file.py ├── recognize_faces_video.py └── search_bing_api.py
10 directories, 12 files
<p>首先,提取128维的人脸嵌入:</p>
<p>命令如下:</p>

```python
python3 encode_faces.py --dataset dataset --encodings encodings.pickle -d hog
记住:如果你的电脑内存不够大,请使用hog模型进行人脸检测,如果内存够大,可以使用cnn神经网络进行人脸检测。
看代码:
# USAGE
# python encode_faces.py --dataset dataset --encodings encodings.pickle

# import the necessary packages
from imutils import paths
import face_recognition
import argparse
import pickle
import cv2
import os

# construct the argument parser and parse the arguments
ap = argparse.ArgumentParser()
ap.add_argument("-i", "--dataset", required=True,
help="path to input directory of faces + images")
ap.add_argument("-e", "--encodings", required=True,
help="path to serialized db of facial encodings")
ap.add_argument("-d", "--detection-method", type=str, default="hog",
help="face detection model to use: either `hog` or `cnn`")
args = vars(ap.parse_args())

# grab the paths to the input images in our dataset
print("[INFO] quantifying faces...")
imagePaths = list(paths.list_images(args["dataset"]))

# initialize the list of known encodings and known names
knownEncodings = []
knownNames = []

# loop over the image paths
for (i, imagePath) in enumerate(imagePaths):
# extract the person name from the image path
print("[INFO] processing image {}/{}".format(i + 1,
len(imagePaths)))
name = imagePath.split(os.path.sep)[-2]

# load the input image and convert it from RGB (OpenCV ordering)
# to dlib ordering (RGB)
image = cv2.imread(imagePath)
rgb = cv2.cvtColor(image, cv2.COLOR_BGR2RGB)

# detect the (x, y)-coordinates of the bounding boxes
# corresponding to each face in the input image
boxes = face_recognition.face_locations(rgb,
model=args["detection_method"])

# compute the facial embedding for the face
encodings = face_recognition.face_encodings(rgb, boxes)

# loop over the encodings
for encoding in encodings:
# add each encoding + name to our set of known names and
# encodings
knownEncodings.append(encoding)
knownNames.append(name)

# dump the facial encodings + names to disk
print("[INFO] serializing encodings...")
data = {"encodings": knownEncodings, "names": knownNames}
f = open(args["encodings"], "wb")
f.write(pickle.dumps(data))
f.close()```

<p>输出结果是每张图片输出一个人脸的128维的向量和对于的名字,并序列化到硬盘,供后续人脸识别使用。</p>
<p>识别图像中的人脸:</p>
<p>这里使用KNN方法实现最终的人脸识别,而不是使用SVM进行训练。</p>
<p>命令如下:</p>

```python
python3 recognize_faces_image.py --encodings encodings.pickle --image examples/example_01.png
看代码:
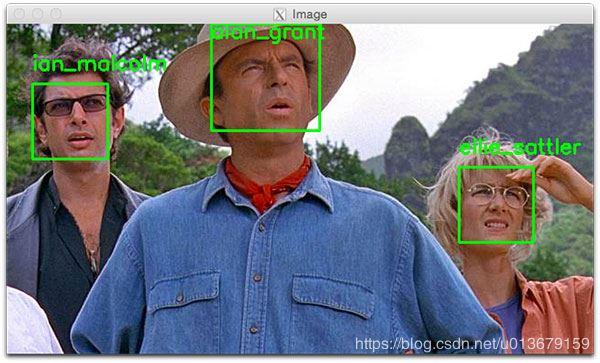
# USAGE
# python recognize_faces_image.py --encodings encodings.pickle --image examples/example_01.png

# import the necessary packages
import face_recognition
import argparse
import pickle
import cv2

# construct the argument parser and parse the arguments
ap = argparse.ArgumentParser()
ap.add_argument("-e", "--encodings", required=True,
help="path to serialized db of facial encodings")
ap.add_argument("-i", "--image", required=True,
help="path to input image")
ap.add_argument("-d", "--detection-method", type=str, default="cnn",
help="face detection model to use: either `hog` or `cnn`")
args = vars(ap.parse_args())

# load the known faces and embeddings
print("[INFO] loading encodings...")
data = pickle.loads(open(args["encodings"], "rb").read())

# load the input image and convert it from BGR to RGB
image = cv2.imread(args["image"])
rgb = cv2.cvtColor(image, cv2.COLOR_BGR2RGB)

# detect the (x, y)-coordinates of the bounding boxes corresponding
# to each face in the input image, then compute the facial embeddings
# for each face
print("[INFO] recognizing faces...")
boxes = face_recognition.face_locations(rgb,
model=args["detection_method"])
encodings = face_recognition.face_encodings(rgb, boxes)

# initialize the list of names for each face detected
names = []

# loop over the facial embeddings
for encoding in encodings:
# attempt to match each face in the input image to our known
# encodings
matches = face_recognition.compare_faces(data["encodings"],
encoding)
name = "Unknown"

# check to see if we have found a match
if True in matches:
# find the indexes of all matched faces then initialize a
# dictionary to count the total number of times each face
# was matched
matchedIdxs = [i for (i, b) in enumerate(matches) if b]
counts = {}

# loop over the matched indexes and maintain a count for
# each recognized face face
for i in matchedIdxs:
name = data["names"][i]
counts[name] = counts.get(name, 0) + 1

# determine the recognized face with the largest number of
# votes (note: in the event of an unlikely tie Python will
# select first entry in the dictionary)
name = max(counts, key=counts.get)

# update the list of names
names.append(name)

# loop over the recognized faces
for ((top, right, bottom, left), name) in zip(boxes, names):
# draw the predicted face name on the image
cv2.rectangle(image, (left, top), (right, bottom), (0, 255, 0), 2)
y = top - 15 if top - 15 > 15 else top + 15
cv2.putText(image, name, (left, y), cv2.FONT_HERSHEY_SIMPLEX,
0.75, (0, 255, 0), 2)

# show the output image
cv2.imshow("Image", image)
cv2.waitKey(0)
实际效果如下:
如果要详细了解细节,请参考:https://www.pyimagesearch.com/2018/06/18/face-recognition-with-opencv-python-and-deep-learning/
到此这篇关于Python基于Dlib的人脸识别系统的实现的文章就介绍到这了,更多相关Python Dlib人脸识别内容请搜索python博客以前的文章或继续浏览下面的相关文章希望大家以后多多支持python博客!
-
<< 上一篇 下一篇 >>
Python基于Dlib的人脸识别系统的实现
看: 1469次 时间:2020-08-10 分类 : python教程
- 相关文章
- 2021-12-20Python 实现图片色彩转换案例
- 2021-12-20python初学定义函数
- 2021-12-20图文详解Python如何导入自己编写的py文件
- 2021-12-20python二分法查找实例代码
- 2021-12-20Pyinstaller打包工具的使用以及避坑
- 2021-12-20Facebook开源一站式服务python时序利器Kats详解
- 2021-12-20pyCaret效率倍增开源低代码的python机器学习工具
- 2021-12-20python机器学习使数据更鲜活的可视化工具Pandas_Alive
- 2021-12-20python读写文件with open的介绍
- 2021-12-20Python生成任意波形并存为txt的实现
-
搜索
-
-
推荐资源
-
Powered By python教程网 鲁ICP备18013710号
python博客 - 小白学python最友好的网站!