PyQt5布局控件QGridLayout简介
QGridLayout(网格布局)是将窗口分割成行和列的网格来进行排列,通常可以使用函数addWidget()将被管理的控件(Widget)添加到窗口中,或者使用addLayout()函数将布局(layout)添加到窗口中,也可以通过addWIdget()函数对所添加的控件设置行数与列数的跨越,最后实现网格占据多个窗格
QGridLayout类中常用的方法
方法 描述 addWidget(QWidget Widget,int row,int col,int alignment=0) 给网格布局添加部件,设置指定的行和列,起始位置的默认值为(0,0) widget:所添加的控件 row:控件的行数,默认从0开始 column:控件的列数,默认从0开始 alignment:对齐方式 addWidget(QWidget widget,int fromRow,int fromColulmn,int rowSpan,int columnSpan,Qt.Alignment alignment=0) 所添加的的控件跨越很多行或者列的时候,使用这个函数 widget:所添加的控件 fromRow:控件的起始行数 fronColumn:控件的起始列数 rowSpan:控件跨越的行数 column:控件跨越的列数 alignment:对齐方式 setSpacing(int spacing) 设置软件在水平和垂直方向的间隔 QGridLayout单一的网格单元格实例
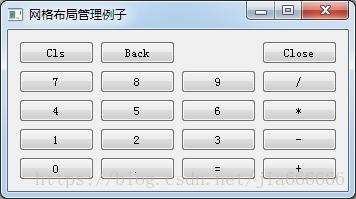
import sys
from PyQt5.QtWidgets import QApplication ,QWidget , QGridLayout, QPushButton
class Winform(QWidget):
  def __init__(self,parent=None):
    super(Winform,self).__init__(parent)
    self.initUI()
  def initUI(self):
    #1创建QGridLayout的实例,并设置窗口的布局
    grid = QGridLayout()
    self.setLayout(grid)
    #2创建按钮的标签列表
    names = ['Cls', 'Back', '', 'Close',
         '7', '8', '9', '/',
        '4', '5', '6', '*',
         '1', '2', '3', '-',
        '0', '.', '=', '+']
    #3 在网格中创建一个位置列表
    positions = [(i,j) for i in range(5) for j in range(4)]
    #4 创建按钮并通过addWIdget()方法添加到布局中
    for position, name in zip(positions, names):
      if name == '':
        continue
      button = QPushButton(name)
      grid.addWidget(button, *position)
    self.move(300, 150)
    self.setWindowTitle('网格布局管理例子')
if __name__ == "__main__":
    app = QApplication(sys.argv)
    form = Winform()
    form.show()
    sys.exit(app.exec_())
运行效果图如下
第一组代码:创建QGridLayout的实例,并设置窗口的布局
第二组代码:创建按钮的标签列表
第三组代码:在网格中创建一个位置列表
第四组代码:创建按钮并通过addWIdget()方法添加到布局中
QGridLayout跨越行和列的网格单元格实例
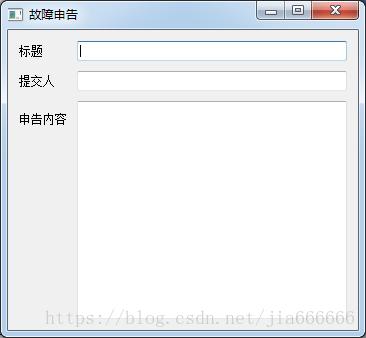
import sys
from PyQt5.QtWidgets import (QWidget, QLabel, QLineEdit,  QTextEdit, QGridLayout, QApplication)
class Winform(QWidget):
  def __init__(self,parent=None):
    super(Winform,self).__init__(parent)
    self.initUI()
  def initUI(self):
    titleLabel = QLabel('标题')
    authorLabel = QLabel('提交人')
    contentLabel = QLabel('申告内容')
    titleEdit = QLineEdit()
    authorEdit = QLineEdit()
    contentEdit = QTextEdit()
    grid = QGridLayout()
    grid.setSpacing(10)
    grid.addWidget(titleLabel, 1, 0)
    grid.addWidget(titleEdit, 1, 1)
    grid.addWidget(authorLabel, 2, 0)
    grid.addWidget(authorEdit, 2, 1)
    grid.addWidget(contentLabel, 3, 0)
    grid.addWidget(contentEdit, 3, 1, 5, 1)
    self.setLayout(grid)
    self.setGeometry(300, 300, 350, 300)
    self.setWindowTitle('故障申告')
if __name__ == "__main__":
    app = QApplication(sys.argv)
    form = Winform()
    form.show()
    sys.exit(app.exec_())
运行效果示意图如下
代码分析
把titleLabel放在QGridLayout布局的第一行第0列
grid.addWidget(titleLabel, 1, 0)
把titleEditl放在QGridLayout布局的第一行第1列
grid.addWidget(titleEdit, 1, 1)
把contentLabel放在QGridLayout布局的第3行第0列
grid.addWidget(contentLabel, 3, 0)
把contentEdit放在QGridLayout布局的第3行第1列,跨越5行1列
grid.addWidget(contentEdit, 3, 1, 5, 1)
本文主要介绍了PyQt5布局控件QGridLayout详细使用方法与实例,更多关于PyQt5布局控件知识请查看下面的相关链接
-
<< 上一篇 下一篇 >>
python GUI库图形界面开发之PyQt5布局控件QGridLayout详细使用方法与实例
看: 1535次 时间:2020-08-07 分类 : python教程
- 相关文章
- 2021-12-20Python 实现图片色彩转换案例
- 2021-12-20python初学定义函数
- 2021-12-20图文详解Python如何导入自己编写的py文件
- 2021-12-20python二分法查找实例代码
- 2021-12-20Pyinstaller打包工具的使用以及避坑
- 2021-12-20Facebook开源一站式服务python时序利器Kats详解
- 2021-12-20pyCaret效率倍增开源低代码的python机器学习工具
- 2021-12-20python机器学习使数据更鲜活的可视化工具Pandas_Alive
- 2021-12-20python读写文件with open的介绍
- 2021-12-20Python生成任意波形并存为txt的实现
-
搜索
-
-
推荐资源
-
Powered By python教程网 鲁ICP备18013710号
python博客 - 小白学python最友好的网站!